|
|
Printing
With the Document/View Architecture,
CDocument, CView
|
| |
|
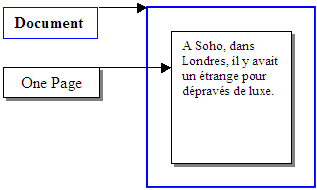
A
Document and its Pages
|
| |
|
When
it comes to printing, the object
from your application is called a
document. Inside of a document, it
is made of one or more pages. A page
is created as part of a document:
|
|
A document is not a physical object. It is an
electronic representation of the result of an
application. Because it is not physical, it
doesn’t have dimensions: it has neither a width
nor a length. On the other hand, a page that is
part of a document has dimensions. When printing,
there are standard dimensions that the printer
will follow.
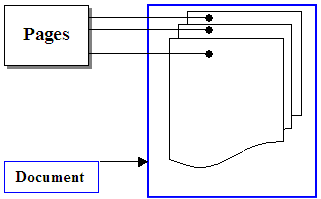
A
document has and must have at least one page. A
document can also have more than one page:
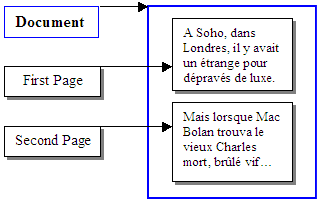
In
the same way, a document can have as many pages as
necessary:
|
 Practical Learning: Introducing the
Document and Pages
Practical Learning: Introducing the
Document and Pages
|
| |
- To
start a new application, on the main menu of
Microsoft Visual C++, click File -> New
-> Project…
- In
the Templates section of the New Project
dialog box, click MFC Application
- In
the Name box, type DepartmentStore2
and click OK
- Click
Application Type and, in the right frame,
click Single Document
- In
the left frame, click Document Template
Strings and, in the Main
Frame Caption, change the string to Department
Store
- In
the left frame, click Generated Classes and
make the following changes:
| Class
Name |
.h
File |
.cpp
File |
Base
Class |
| CExerciseView |
ExerciseView.h |
ExerciseView.cpp |
CScrollView |
| CExerciseApp |
|
|
CWinApp |
| CExerciseDoc |
ExerciseDoc.h |
ExerciseDoc.cpp |
CDocument |
- Click
Finish
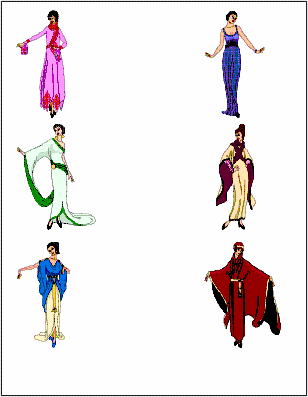
- Copy
each of these pictures
 |
| Cover1.bmp |
 |
 |
| Dress1.bmp |
Dress2.bmp |
 |
 |
| Dress3.bmp |
Dress4.bmp |
 |
 |
| Dress5.bmp |
Dress6.bmp |
- Paste
them in the res
folder of the current project
- On
the main menu, click Project -> Add
Resource…
- In
the Add Resource dialog box, click Import...
- Locate
the res sub-folder
of the current project, click Cover1.bmp
- Press
and hold Ctrl
- Click
Dress1.bmp, Dress2.bmp, Dress3.bmp,
Dress4.bmp, Dress5.bmp, and Dress6.bmp
- Release
Ctrl and click Open
- In
the Resource View, expand the Bitmap folder,
double-click each item and, in the Properties
window, change its ID as follows:
| Filename |
ID |
| res/Cover1.bmp |
IDB_COVER |
| res/Dress1.bmp |
IDB_DRESS1 |
| res/Dress2.bmp |
IDB_DRESS2 |
| res/Dress3.bmp |
IDB_DRESS3 |
| res/Dress4.bmp |
IDB_DRESS4 |
| res/Dress5.bmp |
IDB_DRESS5 |
| res/Dress6.bmp |
IDB_DRESS6 |
- In
the Class View, expand DepartmentStore2,
expand CExerciseView, and double-click
OnInitialUpdate
- Change
it as follows:
void CExerciseView::OnInitialUpdate()
{
	CScrollView::OnInitialUpdate();
	CSize sizeTotal;
	// TODO: calculate the total size of this view
	sizeTotal.cx = 500;
	sizeTotal.cy = 1360;
	SetScrollSizes(MM_TEXT, sizeTotal);
}
|
- In
the Class View, expand CmainFrame and
double-click OnCreate
- Change
the event as follows:
BOOL CMainFrame::PreCreateWindow(CREATESTRUCT& cs)
{
	if( !CFrameWnd::PreCreateWindow(cs) )
		return FALSE;
	// TODO: Modify the Window class or styles here by modifying
	// the CREATESTRUCT cs
	cs.cx = 450;
	cs.cy = 600;
	cs.style &= ~FWS_ADDTOTITLE;

	return TRUE;
}
|
- Save
all
|
Introduction
to Document/View Printing
|
| |
One
of the primary ways Microsoft reduces its
complexity of printing is through device
independence. This means that you should worry
less with the type of device used to print: you
don’t have to care what type of printer or
machine would be used to print a document of your
application. What you have left to do is the
drawing side of the document. You have two main
approaches: using the MFC Application or manually
implementing the document/view architecture of the
MFC library.
As
mentioned in the previous sections, if you use the
MFC Application and decide to create a CView-based
application, the wizard would suggest support for
printing. If you accept it, it would add a Print,
a Print Preview, and a Print Setup options. As the
wizard is writing the primary code for your
application, it would add code for three events: OnPreparePrinting,
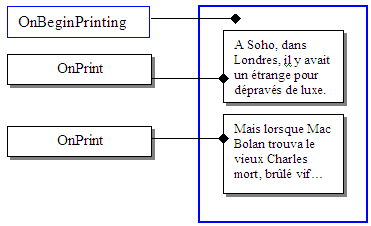
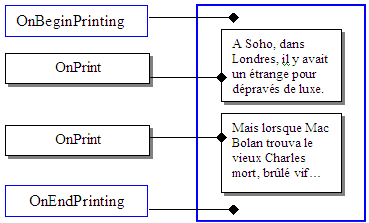
OnBeginPrinting, and OnEndPrinting:
BOOL CExerciseView::OnPreparePrinting(CPrintInfo* pInfo)
{
	// default preparation
	return DoPreparePrinting(pInfo);
}

void CExerciseView::OnBeginPrinting(CDC* /*pDC*/, CPrintInfo* /*pInfo*/)
{
	// TODO: add extra initialization before printing
}

void CExerciseView::OnEndPrinting(CDC* /*pDC*/, CPrintInfo* /*pInfo*/)
{
	// TODO: add cleanup after printing
}
As
you may know by now, the user typically launches
printing by opening the Print dialog box that is
equipped with various options and then clicking
OK. To control how these options are presented to
the user, the view class fires the OnPreparePrinting
event. Its syntax is:
virtual BOOL OnPreparePrinting(CPrintInfo* pInfo);
If
you are manually creating your application, make
sure you add this event. As you can see from the
above lines, the primary code written by the
wizard serves only as a placeholder.
This
event takes as argument a CPrintInfo
object. Notice that it is passed as a pointer.
This is for two good reasons. If you access the
argument, it can give you information about the
print job, information that may have been stored
in the CPrintInfo
object. In the same way, you can use the argument
to make changes to the print job. After making
such changes, call the CView::DoPreparePrinting()
method and pass it the modified CPrintInfo
object. The syntax of this method is:
BOOL DoPreparePrinting(CPrintInfo* pInfo);
The
CView::OnPreparePrinting()
event fires when the user initiates printing but
before the actual printing occurs. This is a good
place to set some options on the Print dialog box.
There are two ways you can do this. You can
directly use the pInfo
object because the CPrintInfo
structure has a member variable named m_pPD
that is of type CPrintDialog.
Another technique consists of creating your own CPrintDialog
object, define it as you wish, and then assigning
it to the m_pPD member
of the pInfo argument.
Here is an example:
BOOL CExerciseView::OnPreparePrinting(CPrintInfo* pInfo)
{
	CPrintDialog *dlg = new CPrintDialog(FALSE, PD_PAGENUMS);
	pInfo->m_pPD = dlg;
	pInfo->SetMinPage(1);
	pInfo->SetMaxPage(14);

	// default preparation
	return DoPreparePrinting(pInfo);
}
|
Practical Learning: Preparing to Print
|
| |
- In
the Class View and under the CExerciseView
node, double-click OnPreparePrinting and
change it as follows:
BOOL CExerciseView::OnPreparePrinting(CPrintInfo* pInfo)
{
	// default preparation
	pInfo->SetMaxPage(2);

	return DoPreparePrinting(pInfo);
}
|
- Save
all
|
Document
Printing Preparation
|
| |
Once
the Print dialog box displays, the user can review,
accept or make changes on it, and then click OK to
print. Of course, the user can click Cancel to give
up. Once the user clicks OK, before the job gets to
the device, you must prepare the tools that would be
used. To assist you with making the preparation for
the actual printing, the view class fires an OnBeginPrinting
event:
The
syntax of the OnBeginPrinting
event is:
virtual void OnBeginPrinting(CDC* pDC, CPrintInfo* pInfo);
The
pDC argument is the
device context of the printer. The pInfo
is used to describe the print job. If you are
manually creating your view-based application, you
should override this event. If you use the MFC
Application, the wizard can create the skeleton code
for you.
Because the OnBeginPrinting
event is fired before the actual printing starts,
you can use it to initialize the GDI tools that
would be used to draw on the printed sheet. To make
sure that these tools are available to other events,
you should have declared them globally.
|
Practical Learning: Beginning to Print
|
| |
- In the Class
View, double-click the CExerciseView node and
declare two private CFont pointers as follows:
private:
	CFont *fntTitle1;
	CFont *fntTitle2;
};
|
- In the Class
View, under CExerciseView, double-click
OnBeginPrinting and change it as follows:
void CExerciseView::OnBeginPrinting(CDC* /*pDC*/, CPrintInfo* /*pInfo*/)
{
	// TODO: add extra initialization before printing
	this->fntTitle1 = new CFont;
	fntTitle1->CreateFont(60, 40, 0, 0,
			      FW_BOLD, FALSE, FALSE, FALSE, ANSI_CHARSET,
				OUT_DEFAULT_PRECIS, CLIP_DEFAULT_PRECIS,
				DEFAULT_QUALITY, DEFAULT_PITCH | FF_ROMAN,
				_T("Times New Roman"));

	this->fntTitle2 = new CFont;
	fntTitle2->CreateFont(100, 50, 900, 0,
				FW_BOLD, FALSE, FALSE, FALSE, ANSI_CHARSET,
				OUT_DEFAULT_PRECIS, CLIP_DEFAULT_PRECIS,
				DEFAULT_QUALITY, DEFAULT_PITCH | FF_ROMAN,
				_T("Times New Roman"));
}
|
- Save all
|
Device
Context Preparation
|
| |
After
allocating GDI resources that would be used to draw,
you can prepare the printer’s device context. To
assist you with this, you can use the OnPrepareDC
event of the view. The syntax of this event is:
virtual void OnPrepareDC(CDC* pDC, CPrintInfo* pInfo = NULL);
The
pDC argument represents the device context of
the printer. The pInfo object contains a
description of the print job such as the number of
pages.
When
preparing the printer’s device context, you can
examine the values of the pInfo argument
here. During printing, the device will check the
information in the pInfo object. For example,
if pInfo doesn’t specify the number of
pages, the printer will consider that the document
contains only one page. In this case, if the
document contains more than one, the first page
would be printed, the CPrintInfo::m_pContinuePrinting
value would be set to FALSE, and the printing would
stop.
While
a printing job is going on, the page that is being
printed at a particular time is referred to as the
current page and it is represented by the CPrintInfo::m_nCurPage
value. Using the OnPrepareDC() event, you can
continually check the value of the CPrintInfo::m_nCurPage
value. When the printer gets to the last page, the
value of this member would be set to 1. Once you
find this out, you can set the CPrintInfo::m_pContinuePrinting
value to FALSE.
The
actual printing occurs in the CView::OnPrint()
event. Its syntax is:
virtual void OnPrint(CDC* pDC, CPrintInfo* pInfo);
The
pDC object is the device context of the
printer, the CDC on which the contents of the
document would be printed. The pInfo object contains
a description of the print job.
While
the OnPreparePrinting event is fired when a
document is sent to the printer, the OnPrint event
is fired for each page to be printed:
You
can use the OnPrint event to format a page
the way you want. For example, you can create a top
section referred to as the header and/or a bottom
section referred to as the footer.
As
stated already, the printing of a page is performed
in response to the CView::OnPrint event. At a
particular time, if you want to find out whether a
print job is currently occurring, you can call the CDC::IsPrinting()
method. If a printing job is going on, this method
returns TRUE. Otherwise, it returns FALSE.
|
Practical Learning: Printing
|
| |
- In the Class
View, click CExerciseView and, in the Overrides
section of the Properties window, click the
arrow of the OnPrint item to select <Add>
OnPrint
- Implement the
event as follows:
void CExerciseView::OnPrint(CDC* pDC, CPrintInfo* pInfo)
{
	// TODO: Add your specialized code here and/or call the base class
	pDC->SetMapMode(MM_ISOTROPIC);
	pDC->SetWindowExt(500, 500);
	pDC->SetViewportExt(4500, 6500);

	if( pInfo->m_nCurPage == 1 )
	{
		CBitmap bmpCover;
		CDC memDCCover;
		CBitmap *bmpOldCover;

		bmpCover.LoadBitmap(IDB_COVER);
		memDCCover.CreateCompatibleDC(pDC);
		bmpOldCover = memDCCover.SelectObject(&bmpCover);

		pDC->SetBkMode(TRANSPARENT);

		pDC->BitBlt(100, 60, 400, 560, &memDCCover, 0, 0, SRCCOPY);
		pDC->SelectObject(bmpOldCover);

		CFont *fntOld = pDC->SelectObject(fntTitle1);
		pDC->TextOut(10, 10, "Collection", 10);
		fntOld = pDC->SelectObject(fntTitle2);
		pDC->TextOut(5, 400, "Spring", 6);
		pDC->SelectObject(fntOld);
	}
	else if( pInfo->m_nCurPage == 2 )
	{
		CBitmap bmpDress1, bmpDress2, bmpDress3,
		bmpDress4, bmpDress5, bmpDress6;
		CDC memDCDress1, memDCDress2, memDCDress3,
		memDCDress4, memDCDress5, memDCDress6;
		CBitmap *pOldDress;

		bmpDress1.LoadBitmap(IDB_DRESS1);
		bmpDress2.LoadBitmap(IDB_DRESS2);
		bmpDress3.LoadBitmap(IDB_DRESS3);
		bmpDress4.LoadBitmap(IDB_DRESS4);
		bmpDress5.LoadBitmap(IDB_DRESS5);
		bmpDress6.LoadBitmap(IDB_DRESS6);

		memDCDress1.CreateCompatibleDC(pDC);
		memDCDress2.CreateCompatibleDC(pDC);
		memDCDress3.CreateCompatibleDC(pDC);
		memDCDress4.CreateCompatibleDC(pDC);
		memDCDress5.CreateCompatibleDC(pDC);
		memDCDress6.CreateCompatibleDC(pDC);

		pOldDress = memDCDress1.SelectObject(&bmpDress1);
		pDC->BitBlt(10, 10, 94, 200, &memDCDress1, 0, 0, SRCCOPY);

		pOldDress = memDCDress2.SelectObject(&bmpDress2);
		pDC->BitBlt(360, 10, 113, 200, &memDCDress2, 0, 0, SRCCOPY);

		pOldDress = memDCDress3.SelectObject(&bmpDress3);
		pDC->BitBlt(10, 220, 148, 200, &memDCDress3, 0, 0, SRCCOPY);

		pOldDress = memDCDress4.SelectObject(&bmpDress4);
		pDC->BitBlt(380, 220, 78, 200, &memDCDress4, 0, 0, SRCCOPY);

		pOldDress = memDCDress5.SelectObject(&bmpDress5);
		pDC->BitBlt(10, 440, 100, 200, &memDCDress5, 0, 0, SRCCOPY);

		pOldDress = memDCDress6.SelectObject(&bmpDress6);
		pDC->BitBlt(360, 440, 143, 200, &memDCDress6, 0, 0, SRCCOPY);

		pDC->SelectObject(pOldDress);
	}

	CScrollView::OnPrint(pDC, pInfo);
}
|
- In the Methods
combo box, select OnDraw and change it as
follows:
void CExerciseView::OnDraw(CDC* pDC)
{
	CExerciseDoc* pDoc = GetDocument();
	ASSERT_VALID(pDoc);
	if (!pDoc)
		return;

	// TODO: add draw code for native data here
	if( !pDC->IsPrinting() )
	{
		CBitmap bmpCover,
		bmpDress1, bmpDress2, bmpDress3,
		bmpDress4, bmpDress5, bmpDress6;
		CDC memDCCover,
		memDCDress1, memDCDress2, memDCDress3,
		memDCDress4, memDCDress5, memDCDress6;

		bmpCover.LoadBitmap(IDB_COVER);
		bmpDress1.LoadBitmap(IDB_DRESS1);
		bmpDress2.LoadBitmap(IDB_DRESS2);
		bmpDress3.LoadBitmap(IDB_DRESS3);
		bmpDress4.LoadBitmap(IDB_DRESS4);
		bmpDress5.LoadBitmap(IDB_DRESS5);
		bmpDress6.LoadBitmap(IDB_DRESS6);

		memDCCover.CreateCompatibleDC(pDC);
		memDCDress1.CreateCompatibleDC(pDC);
		memDCDress2.CreateCompatibleDC(pDC);
		memDCDress3.CreateCompatibleDC(pDC);
		memDCDress4.CreateCompatibleDC(pDC);
		memDCDress5.CreateCompatibleDC(pDC);
		memDCDress6.CreateCompatibleDC(pDC);

		CBitmap *bmpOld = memDCCover.SelectObject(&bmpCover);

		pDC->BitBlt(80, 60, 400, 560, &memDCCover, 0, 0, SRCCOPY);

		bmpOld = memDCDress1.SelectObject(&bmpDress1);
		pDC->BitBlt(10, 680, 94, 200, &memDCDress1, 0, 0, SRCCOPY);

		bmpOld = memDCDress2.SelectObject(&bmpDress2);
		pDC->BitBlt(360, 680, 113, 200, &memDCDress2, 0, 0, SRCCOPY);

		bmpOld = memDCDress3.SelectObject(&bmpDress3);
		pDC->BitBlt(10, 900, 148, 200, &memDCDress3, 0, 0, SRCCOPY);

		bmpOld = memDCDress4.SelectObject(&bmpDress4);
		pDC->BitBlt(380, 900, 78, 200, &memDCDress4, 0, 0, SRCCOPY);

		bmpOld = memDCDress5.SelectObject(&bmpDress5);
		pDC->BitBlt(10, 1150, 100, 200, &memDCDress5, 0, 0, SRCCOPY);

		bmpOld = memDCDress6.SelectObject(&bmpDress6);
		pDC->BitBlt(340, 1150, 143, 200, &memDCDress6, 0, 0, SRCCOPY);

		CFont fntVertical;
		CFont fntHorizontal;
		CFont *pFont;

		pDC->SetBkMode(TRANSPARENT);
		fntHorizontal.CreateFont(60, 40, 0, 0,
				FW_BOLD, FALSE, FALSE, FALSE, ANSI_CHARSET,
				OUT_DEFAULT_PRECIS, CLIP_DEFAULT_PRECIS,
				DEFAULT_QUALITY, DEFAULT_PITCH | FF_ROMAN,
				_T("Times New Roman"));
		pFont = pDC->SelectObject(&fntHorizontal);
		pDC->TextOut(10, 10, "Collection", 10);

		fntVertical.CreateFont(100, 50, 900, 0,
				FW_BOLD, FALSE, FALSE, FALSE, ANSI_CHARSET,
				OUT_DEFAULT_PRECIS, CLIP_DEFAULT_PRECIS,
				DEFAULT_QUALITY, DEFAULT_PITCH | FF_ROMAN,
				_T("Times New Roman"));
		pFont = pDC->SelectObject(&fntVertical);

		pDC->TextOut(5, 400, "Spring", 6);

		pDC->SelectObject(fntVertical);
		fntVertical.DeleteObject();
		fntHorizontal.DeleteObject();
	}
}
|
- Save all
|
Document
Printing Finalization
|
| |
Eventually,
after a print job has been performed, the view would
fire an OnEndPrinting event:
Its
syntax is:
virtual void OnEndPrinting(CDC* pDC, CPrintInfo* pInfo);
This
event takes the same arguments as its counterpart
the OnBeginPrinting. This event is a good
place to free the GDI resources that were allocated.
|
Practical Learning: Finalizing a Printing
Job
|
| |
- In the Class
View, under the CExerciseView node, double-click
OnEndPrinting and change it as follows:
void CExerciseView::OnEndPrinting(CDC* /*pDC*/, CPrintInfo* /*pInfo*/)
{
	// TODO: add cleanup after printing
	delete fntTitle1;
	delete fntTitle2;
}
|
- Execute the
application and print its document
- Close the
application
|
|