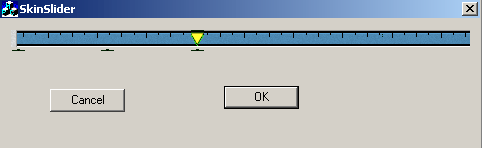
Introduction
Here is a solution for
developers looking for a skin
based slider control.
It is different from the article
Transparent Slider Control
by Nic Wilson in the way that it allows you to skin the background
and tick of the slider control and also allows you to
have a customized cursor over the slider
control.
The main class for slider
control is CZipSliderCtl that
uses another bitmap class CZipBitmap for
drawing normal and transparent images on the control.
It is very easy to use and looks good (if you have
good-looking images), so go for it. Follow the following
instructions to use it in your application.
How to use it?
Its fairly simple to
use the CZipSliderClt class. Just add the
files ZipSliderCtl.h, ZipSliderCtl.cpp, ZipBitmap.h,
ZipBitmap.cpp into your project, add the slider
control to your dialog box and change the
member variable of the control. Modify the following
code
CSliderCtl m_sliderCtl;
to look like this:
CZipSliderCtl m_sliderCtl;
You will need add the
following code at the top of you application's dlg
header file.
#include "ZipSliderCtl.h"
Congratulations you
have successfully created the object of the slider
control and now it is time to skin the control. Add the
following code at the bottom of OnInitDialog
function
	m_sliderCtl.SetSkin(IDB_SEEKBAR_BACK,IDB_SEEKBAR_TICK,IDC_CURSOR_SEEK);
	m_sliderCtl.SetRange(0,15000);
So you have skinned
your control and it is ready to use. Compile and run to
see how it looks. All the best.. enjoy!!!
Behine the scenes
The CZipSliderCtl
class is based on the fairly simple concept of
subclassing. I have derived this class from CSliderCtl
and have overridden the following functions
	//{{AFX_MSG(CZipSliderCtl)
	afx_msg void OnMouseMove(UINT nFlags, CPoint point);
	afx_msg void OnPaint();
	afx_msg void OnLButtonUp(UINT nFlags, CPoint point);
	afx_msg void OnLButtonDown(UINT nFlags, CPoint point);
	afx_msg void OnKeyUp(UINT nChar, UINT nRepCnt, UINT nFlags);
	afx_msg void OnKeyDown(UINT nChar, UINT nRepCnt, UINT nFlags);
	afx_msg BOOL OnSetCursor(CWnd* pWnd, UINT nHitTest, UINT message);
	//}}AFX_MSG
I have used the class CZipBitmap
to draw the normal and transparent images on the dialog
box. If any transparent image is drawn using this class,
it makes all the portions of let-top pixel color
transparent. The magic of skinning the control is always
contained in the OnPaint function. So look
at the following magical lines of code
{
	CPaintDC dc(this); // device context for painting

	int iMax,iMin,iTickWidth=10,iMarginWidth=10;
	GetRange(iMin,iMax);
	RECT rcBack,rcTick;
	GetClientRect(&rcBack);
	rcTick = rcBack;
	TRACE("%d\n",GetPos());
	rcTick.left = ((rcBack.right-iMarginWidth)*(GetPos()))/((iMax - iMin)+iMarginWidth/2);
	rcTick.right = rcTick.left + iTickWidth;

	m_bmpBack->Draw(dc,0,0);
	m_bmTrans->DrawTrans(dc,rcTick.left, -2);
}
so its all done. I hope
my efforts will be appreciated