-
Writing a COM Object
with VisualBasic 6.0
-
Building COM Objects
with Java
- Using Business Objects (COM Components) In Your ASP Code
Furthermore, this article makes no attempt to teach the C++ syntax and assumes the reader is already familiar with the C++ language. For this article I will be using Microsoft Visual C++ 6.0.
Now that we've got all of
the disclaimers out of the way, let's start
building our
COM component! For this
article we will be creating a very simple (but useful)
COM component. This
COM component will
calculate a binomial coefficient, sometimes referred to as a
combinatorial. A combinatorial,
C(n,k),
indicates how many ways n
items can be arranged into groups of size
k.
For example, if we have four objects,
a,
b,
c,
and d,
these can be arranged into four groups of size 3:
a b c,
a b d,
a c d,
and b c d.
Note that order is not important; that is,
a b d
and d b a
are considered equal.
In the above example, we
showed that
C(4,3) = 4.
This would be pronounced "4 choose 3 equals 4," meaning that
out of a pool of four objects, there are four ways to create
groups of size three. Our COM
component will be used to calculate
n
choose k.
It will consist of a single method,
Comb,
that expects two parameters:
n
and k.
The method returns the value of
n
choose k.
The Comb
method will use the formula for binomial coefficients, which
is:
C(n,k) = n! / (k! *
						(n-k)!)
The exclamation point is a short-hand way of denoting a factorial. Factorials are large numbers, computed by the formula:
n! = n * (n-1) *
						(n-2) * ... * 3 * 2 * 1
Therefore
5! = 5 * 4 * 3 *
					2 * 1
,
or 120. Now, you may be wondering why the hell anyone would
be interested in these types of things. Believe it or not,
but binomial coefficients have many practical uses in
mathematics, especially in probability. Therefore, we can
use combinatorials to determine gambling odds! For a look at
how to calculate gambling odds with binomial coefficients
check out the
extended readings for this article.
Building the Component
in Visual C++
If you've built a COM component
in VisualBasic before, you may think that
COM objects are quite
simple and can be built in a relatively short amount of
time. This is a misconception - COM
is a very intricate technology that is anything but
"simple." VisualBasic, kindly, hides the messy details,
making it appear very straightforward and simple.
COM components can be
built from the ground up just using C or C++, but that is
incredibly involved and difficult. To aid with
developing COM components
in Visual C++ Microsoft
has provided ATL (Active Template Library).
ATL allows the program to contain macro-like language which
is converted into the more complex-COM
code at compile time. Furthermore, ATL Wizards exist to make
the process of creating a COM
component that much easier. In this article we'll
use those Wizard to greatly simplify development.
Since building a COM component is much more involved using Visual C++/ATL than using a language like VisualBasic or Java, one may wonder why anyone would wish to create a COM component using Visual C++. The decision to use Visual C++ is usually a performance-based one. Apps built using Visual C++ still boasts better performance than those built using VisualBasic; also, with Visual C++ you can perform lower-level functions, such as working with pointers, and make use of the standard template library (STL); finally, C++ is cool and is a very neat programming language. Of course, if you are wanting to prototype a COM component or are not overly concerned with performance, use VisualBasic or Java due to the time you'll be able to save during component development.

That being said, let's start building our COM component! Begin by starting up Visual C++ and selecting to create a New Project. You should be presented with the following dialog box on the right.
Select the create an
ATL COM AppWizard
Project and give it the Project name
Math.
Once you have selected this you will be taken to the
ATL COM AppWizard. This
Wizard, which we'll discuss in detail in
Part 2, will write the vast majority of the code needed
to build our COM component!
In Part 1 we discussed binomial coefficients and how to start the COM component building process in Visual C++. In this part we'll continue to work through the steps of building the COM component! (Interested in learning more about binomial coefficients? Be sure to visit the extended readings!)

Recall that in
Part 1 we left off with selecting to create an
ATL COM AppWizard
Project named
Math.
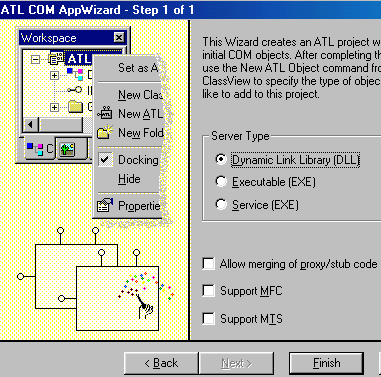
From that first dialog box we are taken into the
ATL COM AppWizard, which
contains only one step. The Wizard can be seen to the right.
Make sure you choose to create a DLL and leave the three checkboxes unchecked. When you are ready, click on the Finish button. At that point you will be presented with a dialog box that lists the files the wizard will create. Click OK and the needed skeleton files will automatically be generated.
While the Wizard has
created the skeleton files for the
Math
project, we still have to create a class in the project that
contains the properties and methods we need. To do this, we
will add a Simple ATL Object. To do this, go to the
ClassView and right click on the
Math classes
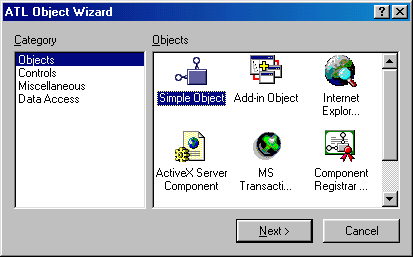
text; select the option New ATL Object. At this point you
should be presented with the following dialog box:

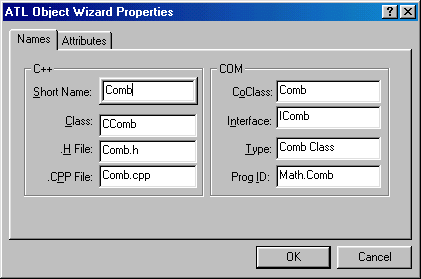
Choose to add a simple object and click Next. You will now be taken to a dialog box into which you can enter the properties for the new simple object, as shown below:

Simply enter the value
Comb
in the Short Name text box. The rest of the text boxes will
be filled out automatically. Note that the ProgID text box
has a value of Math.Comb.
This is the ProgID we'll use in our ASP page to instantiate
our COM component (Server.CreateObject("Math.Comb")).
Take a moment to click on the Attributes tab in the above
dialog box. This shows the threading model, interface, and
aggregation types for the component. For this example, leave
the default values selected.
By adding a new simple ATL
object, a class,
CComb,
has been added to our project. Also the interface
IComb
has also been added. This interface determines how the
outside world (an ASP page, for example) sees the COM
component. To add properties and methods to our component we
will add methods and properties to this interface. The
interface's properties and methods are mapped to public
member functions in the class
CComb.
In
Part 3 we'll look at how to add the
Comb
method to our IComb
interface and how to tie a
CComb
member function to this interface method!
In Part 2 we looked at how to use the ATL COM AppWizard to build the skeleton files needed for our COM component. Also, we examined how to add a Simple ATL Object to the project. In this part we will look at how to add methods to the Simple ATL Object's interface.
Comb,
will take two integer inputs,
n
and k,
and return the value of
C(n,k)
(which is also an integer). Therefore we
will need to add one method to our interface
IComb.
To do this, right click on the interface
name,
IComb,
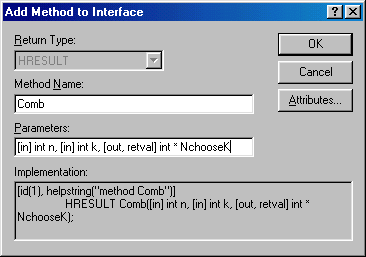
and select Add Method. You will be presented
with the dialog box on the right.
Note that
in the dialog box I entered
To add a property to a COM component, right click on the interface and select Add Property. Since this component doesn't require any properties, we won't be creating one in this article. Once you
have entered the Method Name and Parameters
values in the Add Method to Interface dialog
box, click OK. This will create a new method
in the interface
The code
for the
|
|
News: 1 UCanCode Advance E-XD++ CAD Drawing and Printing Solution Source Code Solution for C/C++, .NET V2025 is released!2 UCanCode Advance E-XD++ HMI & SCADA Source Code Solution for C/C++, .NET V2025 is released! 3 UCanCode Advance E-XD++ GIS SVG Drawing and Printing Solution Source Code Solution for C/C++, .NET V2025 is released!
|


